western blot troubleshooting starts with sequential analysis

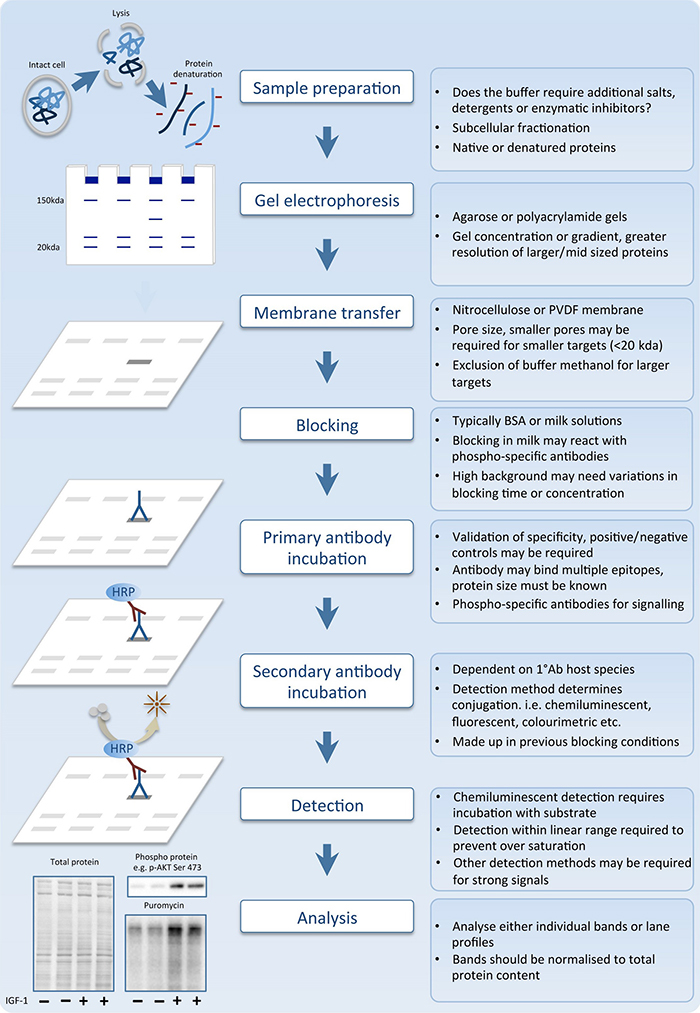
Fig. 1. The sequential stages of the western blot process.
Photo courtesy of”

http://onlinelibrary.wiley.com/doi/10.1111/sms.12702/full

The 8 basic steps of the science of Western blotting have remained the same for the last 40 years.

1. First, sample preparation: lysing and denaturing the proteins.
2. Next, gel electrophoresis.
3. Then membrane transfer.
4. After that blocking.
5. Then incubating the primary antibody.
6. And, then incubating the secondary antibody.
7. Next detection.
8. And, finally analysis.

But, while the steps haven’t changed, new methods of automation for the blocking, washing and incubating the primary and secondary antibodies have increased reliability and reproducibility in Western blot research.
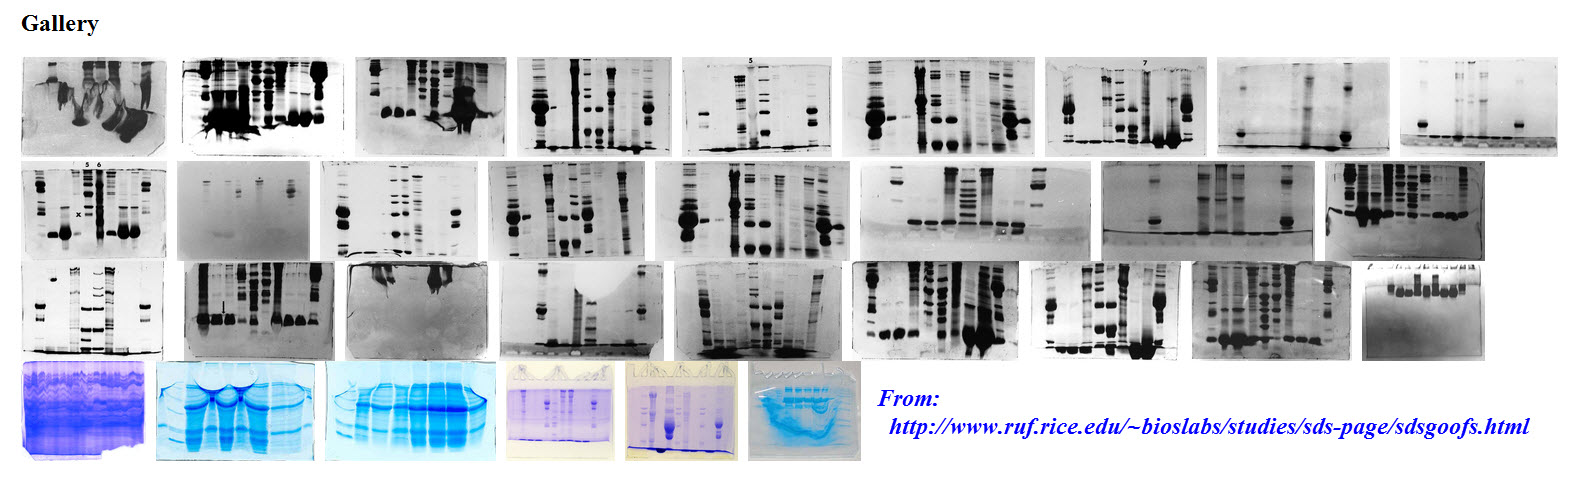
Western blot troubleshooting

Photo courtesy of:
http://www.ruf.rice.edu/~bioslabs/studies/sds-page/sdsgoofs.html

However even with automation, not every blot turns out the way we’d like. As a matter of fact, Rice University has an online “Hall of Shame” that presents Western blot goofs. The site discusses the joys and “oh boys” of some of the most colorful Western blot failures. Sometimes blot failures can be attributed to bad antibodies; however, this article relates that variations in western blot assay results occur because of errors in manual processing.

So, to assist you, whether you do manual or automated processing, we’re providing this:

Western Blot Troubleshooting Guide (click to download the PDF)

Problem

Diffuse Bands

Possible Cause

1.  Antibody concentration too high

2. Excess protein on gel

3.  Protein transfer was too fast and/or the gel was over-heated during electrophoresis

Solution

  • 1. Decrease antibody concentration.

  • 2. Reduce the amount of total protein loaded on the gel.

  • 3. Increase transfer time
    and
    Apply cooling system for electrophoresis.

Problem

Nonspecific bands

Possible Cause

1. Non-specific binding to immobilized protein bands caused by SDS

2. Gradually accumulative differences of protein expression profiles due to frequent passage of cell lines

3.  Degraded protein sample

4. Presence of new proteins or different splice variants that share similar epitopes

5. Presence of impurities with antibody

6. Formation of multi-mer on protein target

7. Formation of different protein subtypes which have different molecular weights

8. Presence of multi-modifier locus in protein

9. Primary antibody concentration too high

10. Non-specific bands caused by secondary antibody

11. Excess protein on gel

12. Insufficient washing

13. Blocking problem

Solution

  • 1. Wash blots after transfer
    and
    Don’t use SDS

  • 2. Go back to original non-passaged cell line
    and then run current
    and original cell line samples in parallel.


  • 3. Use fresh sample
    and
    use protease inhibitor.

  • 4. Check the literature for other reports.
    Perform a BLAST search.
    Use a cell line or tissue reported on the instructions.

  • 5. Use a monoclonal antibody.
    Purify the antibody by affinity method.

  • 6. Before running SDS PAGE gel, boil protein for 10 minutes to disrupt multi-mer.

  • 7. Examine the literature and use bioinformatics analysis to estimate the correct size of the protein.

  • 8. Examine the  literature and use bioinformatics analysis to confirm the presence of modifier locus and its molecular weight.

  • 9. Decrease the primary antibody concentration.

  • 10. Use fluorescence labels on the primary antibody.
  • 11. Reduce the amount of total protein loaded on the gel.

  • 12. Increase the number of washes.

  • 13. Increase blocking time
    and
    optimize the choice of blocking agent.

Problem

Weak or no signal from the blot

Possible Cause

1. Detection step missed or detection reagents not working.

2. Insufficient incubation with detection reagent.

3. Poor or incomplete transfer

4. Protein of interest ran off the gel

5. Incorrect reagents added or incorrect containers are filled

6. Sample is too dilute.

7. Poor retention of proteins or the protein is weakly bound to membrane.

8. Inactive or overly dilute primary or secondary antibody.

Solution

  • 1. After the blot processing is complete, perform the detection step using your standard detection reagents and protocol manually. Make sure the detection reagents are functional.

  • 2. Remove the blot from detection reagent when signal-to-noise ratio is acceptable.

  • 3. Make sure transfer apparatus and membrane sandwiches are assembled correctly. Use appropriate transfer times. After blotting, stain membrane to measure transfer efficiency.

  • 4. Use positive control and/or molecular weight marker to match gel separation range to size of protein being blotted. After blotting, stain membrane to measure transfer efficiency.

  • 5. Make sure that primary and secondary antibodies are added to correct containers and the numbers on the antibody container in the tank and tray match each other.  Make sure primary and secondary antibodies, substrates,  enzyme system and samples are compatible.

  • 6. Load the larger amount of protein onto the gel or increase concentration of proteins.

  • 7. Use membranes with appropriate binding capacity. Dry PVDF membrane after protein transfer to ensure strong binding of the proteins.

Problem

High background on the blot

Possible Cause

1. Film overexposed or became wet during exposure

2. Short blocking time or washing intensity

3. High concentration of primary and/or secondary antibody

4. Protein is overloaded

5. Membrane, solutions, trays, or antibody containers are contaminated.

Solution

  • 1. Decrease exposure time or allow signal to further decay. Prevent leakage of solutions by encasing membrane in transparency film and blotting excess substrate from edges before exposure.

  • 2. Increase blocking time and number of washes.
  • 3. Determine optimal antibody concentration by performing dilution series using all six trays of the BlotCycler™.  Decrease antibody concentration as necessary.

  • 4. Reduce load or dilute concentration of sample.

  • 5. Use clean glassware and purified water to prepare solutions. Wear clean gloves at all times. Use forceps when handling membranes. Run cleaning protocol with cleaning buffer, and increase the concentration of cleaning buffer two times.

Problem

Non-specific binding too high

Possible Cause

1. Insufficient removal of SDS or weakly bound proteins from membrane after blotting.

2. Short blocking time

3. Affinity of the primary antibody for the protein standards

4. Protein is overloaded

Solution

  • 1.  Follow the proper protocol for membrane preparation before immunodetection.

  • 2. Increase blocking time.

  • 3. Check with protein standard manufacturer for homologies with primary antibody.

  • 4. Reduce load or dilute concentration of sample.

If you need technical help with your BlotCycler™ device that’s not discussed here in our Western Blot Troubleshooting Guide, please contact us 1-888-490-4443. extension 1.

For answers to the most frequently asked questions Click here to learn more

Save

Save

Save

Save

Save

Save

Save

Save